I’ll take any excuse to bake. Any family event, obscure holiday or (even, on occasion) less cryptic conventional birthday – I’m your girl to stock up the dessert table. Qunceñera? Bar Mitzvah? Filipino Debut? Holler! (I happen to specialize in celebrations of acute cultural rites of passage.) Just give me a reason to party and I’ll whip up 10-20 of my most crowd-pleasing sweets, no questions asked. I lived up to this promise this past weekend, and was promptly schooled in the most recent craze to hit the Pinterest boards of mothers-to-be across America: the Gender Reveal Party.
I’ve been lucky to have been informally adopted by the best Mexicans this side of the border (if I’m an honorary Mexican, I can say that right?), one of whom which is expecting! To commemorate such an exciting event, we decided to kick off the second trimester with a Gender Reveal Party, á la chic-mama-of-2013. Here, the doctor contacts a third party while the mother- and father-to-be are kept in the dark about the baby’s gender. That third party (a very responsible, extremely reliable, and incredibly trustworthy person) creates some type of big reveal shrouded in blue or pink to announce the gender amongst friends and family at said Gender Reveal Party. I (naturally having all the qualities listed above) was honored to be chosen to create the big reveal.
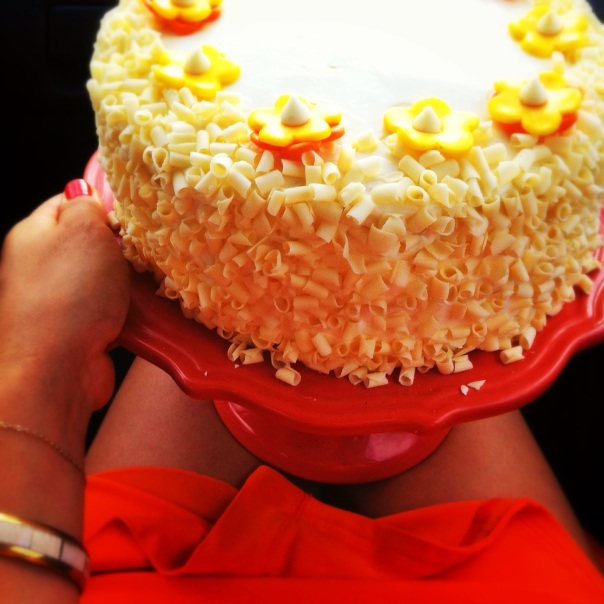
Typically, the parents-to-be cut into a deceivingly iced cake that is blue or pink on the inside, so I was the clear Panadero China for the job. This was my first attempt at making a layered cake, so being the neurotic baker that I am, I did my research. Turns out you just need to utilize your freezer and channel your inner zen: lots of patience and lots of taste-testing. Its really not that difficult, actually – especially when you’re baking for such a momentously fun event. I was just a little off-put by the radically saturated food coloring, but the damn thing still tasted pretty bomb, if I do say so myself.

I ramble like the cake was the centerpiece of the party, but it was really just a vestibule to announce the greatest news thus far in 2013. I am so insanely excited for the parents-to-be and their new baby girl, and was just so happy to be included in their fabulous celebration! I also designed the invitations, baked three types of brownies, two types of shortbread and got my mom to bake for the event – but that’s all small potatoes, really. I CAN’T WAIT TO MEET YOU, BABY LEE!

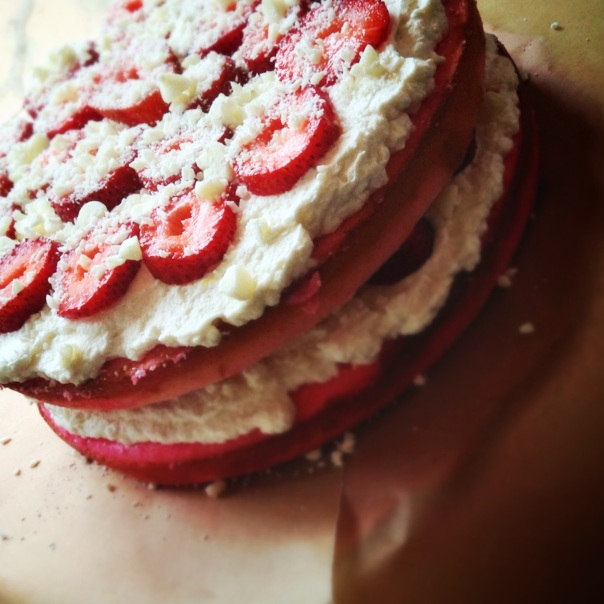
Strawberry White Chocolate Layered Cake
Adapted from Joy the Baker and Smitten Kitchen
For the Cake:
4 cups cake flour
2 teaspoons baking powder
1 1/2 teaspoons baking soda
1 teaspoon salt
1 cup (2 sticks) unsalted butter, softened to room temperature
2 cups sugar
1 tablespoon pure vanilla extract
4 large eggs, at room temperature
2 cups buttermilk
1/2 cup white chocolate chunks
1 lemon’s worth of zest
Optional: pink food coloring
For the Filling:
3 cups heavy whipping cream
1/2 cup cream cheese
1/4 cup powdered sugar
1 lemon’s worth of zest
2 teaspoons pure vanilla extract
1/2 cup finely chopped white chocolate chunks
1 1/2 cups sliced strawberries
For the Icing:
3 (8 ounce) packages cream cheese, softened
3/4 cup (1 1/2 sticks; 6 ounces) unsalted butter, softened
3 cups sifted confectioners’ sugar
2 teaspoons vanilla extract
1 lemon’s worth of zest
Butter and flour three 8-inch round cake pans. In a large bowl, whisk together flour, baking powder, baking soda, and salt. Set aside.
In the bowl of an electric stand mixer fitted with a paddle attachment, beat butter and sugar at medium speed until pale and fluffy, about 3 to 4 minutes. Add eggs one at a time, beating well and scraping down the bowl after each addition. Beat in vanilla extract.
Turn the mixer speed to low and add half of the dry ingredients. Add half of the buttermilk and beat until just combined. Add the remaining flour and buttermilk and beat until just combined. Remove the bowl from the stand mixer and finish incorporating the batter with a spatula. Scrape the bottom of the bowl to make sure there is no butter or flour hiding down there. Fold in the chocolate chips. Add any food coloring if need be.
Divide the batter among the cake pans. Spread batter evenly in each pan then rap each pan on the counter top to help the batter settle and eliminate any air bubbles. Bake until bubbled and golden brown, about 20-25 minutes. Insert a skewer into the center of the cake. Cool cakes in the pan for 10 minutes before inverting onto a wire rack to cool completely. When the cakes are cooled completely, place on cake boards, wrap in saran wrap and freeze for 30 mins to an hour.
To make the frosting, combine heavy cream, powdered sugar, cream cheese and lemon zest in the bowl of a stand mixer fitted with a whisk attachment. Beat on medium speed until soft peaks form. Once soft peaks form in the whipped cream, keep an eye on it. Continue beating just past the soft peak stage.
To assemble the cake, place three strips of parchment paper onto a cake plate or cake stand. Place one cooled cake round atop the parchment paper. Level with a large knife. Spread a generous amount of whipped cream atop the first layer. Arrange half of the sliced strawberries atop the whipped cream and sprinkle with half of the finely chopped white chocolate.
Level the second (middle) cake layer and place atop the frosted layer. Top with more whipped cream, the remaining sliced strawberries, and sprinkle with the remaining white chocolate. Top with the last cake later. Spread whipped cream across the top of the cake and smooth along the sides. This is your “crumb coat.” Freeze the entire cake for 30 minutes.
Make the icing: In a medium bowl, cream together the cream cheese and butter until creamy. Mix in the vanilla, then gradually stir in the confectioners’ sugar and lemon zest. Take the naked cake out of the freezer and gently smooth the icing over the gently frozen crumb coat? Wasn’t that easy?
I decorated with shaved white chocolate and fondant flowers brushed with edible gold powder. NBD.